

Have you ever noticed how a photo can make you smile long after a trip? Travel photography is fun and simple. In this guide, we share a few easy tips to help you capture real, happy moments.
Try using a basic 3×3 grid to keep your shots balanced. Keep an eye out for that quick, genuine smile and use simple gear you already have. With these tricks, everyday scenes can become cherished keepsakes that boost your mood.
Get ready to see your travels in a brand-new light as you learn to frame moments that truly matter.
Core travel photography basics: fundamental techniques
Travel photography is all about building a simple base that helps you capture genuine moments. By mastering these basic tips, you can focus on what is most important during your trip and create photos that truly reflect a place's vibe. These basics help you notice great photo opportunities, even in everyday scenes.
Learning these tricks makes your photography more fun and effective. Whether you're snapped with a fancy DSLR or just your smartphone, using simple methods can boost your creativity and confidence. This turns regular sightseeing into a chance for memorable photos.
-
Rule of Thirds: Picture your shot divided into 9 boxes (3×3 grid) and place the key subject along one of the grid lines or where they cross. For example, try positioning a landmark off-center for a balanced feel.
-
Decisive Moment: Look for that split-second event that tells a story, like catching a local laughing during a street performance.
-
Golden Hours: Shoot shortly after sunrise or just before sunset. The soft, warm light at these times adds a natural glow to your pictures.
-
Minimal Kit: Carry just one camera body and one lens. This keeps you light on your feet and focused on the scene, not the gear.
-
Shot Planning: Jot down quick ideas or a shot list in your notebook before you head out. This little step might spark a creative breakthrough.
Blending these techniques helps you take clearer, more engaging photos. With a simple mix of gridlines, good timing, and a minimalist approach, your images will naturally capture the heart of your travels.
Essential travel photography gear for beginners
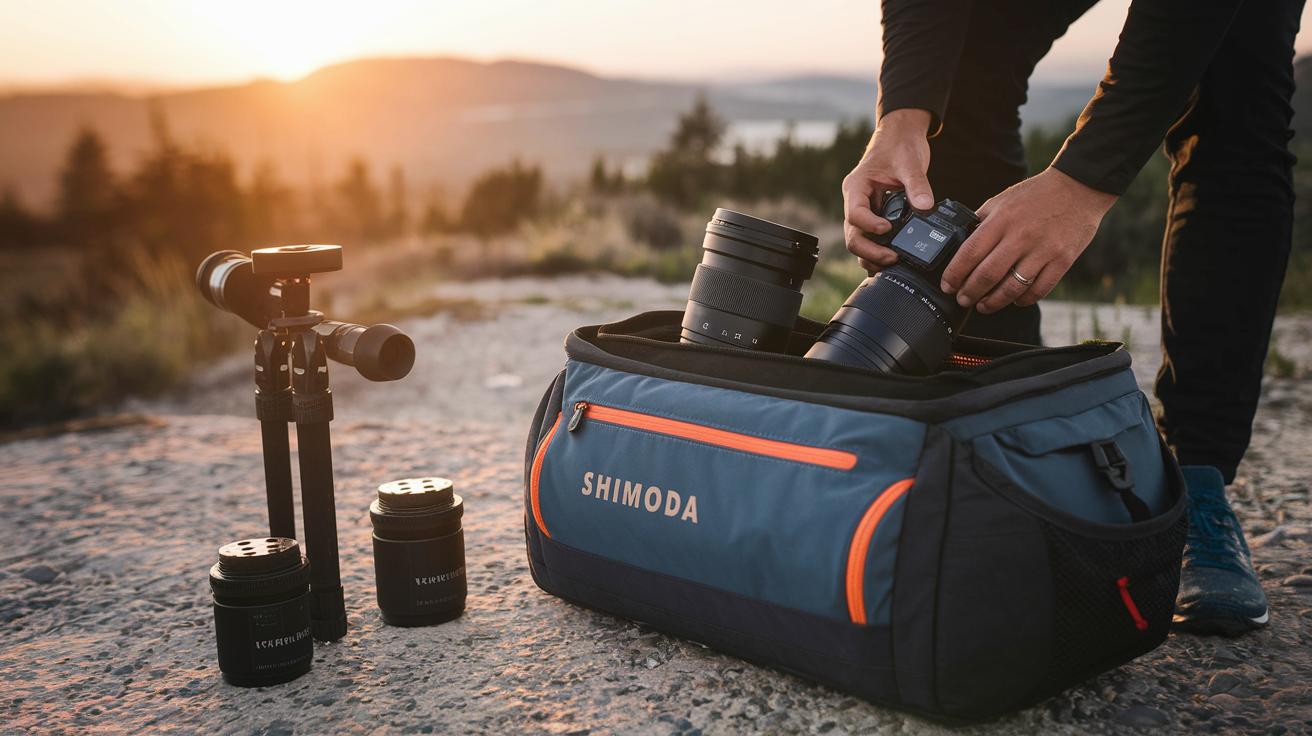
When you’re prepping for travel, keep your gear light and secure. A good camera bag is key, and many photographers trust the Shimoda Explore v2 30L for its ease of use and solid protection. A compact kit means you can snap those memorable moments without feeling weighed down.
Here are 7 items you should pack:
- Camera bag (like the Shimoda Explore v2 30L)
- Two lenses: a 16–35 mm wide-angle and a 70–200 mm telephoto to cover different scenes
- Compact tripod for long exposures and clearer low-light photos
- Spare batteries, clearly labeled for quick swaps so you never miss a shot
- Memory cards with at least 64 GB capacity and a plan for regular backups
- A cleaning kit to keep your lenses and sensors dust-free
- Protective cases for safely carrying extra gear
Make sure to inspect your equipment regularly for any signs of wear or damage. It helps to have a simple routine for backing up your files and updating your shot list so everything stays organized. For more practical tips on packing your camera gear, check out the ideas at https://thetravelinginsider.com?p=735.
Location scouting guidelines for travel photography basics
Before you head out, gather ideas and plan your shots. Use online maps and local blogs to find spots that offer a true local feel. Jot down shot ideas, angles, and the best times in your notebook.
When you get there, take some time to explore on foot. Walk around the neighborhood and notice how the sun and shadows play across buildings and streets. Check the local weather and watch how the light changes to help you refine your ideas.
Plan your shoots with plenty of time to set up. Try to visit popular spots early or late in the day to avoid busy crowds and capture quieter, genuine moments. Pack only what you need and be ready to adjust your plans if the weather changes. This way, even unexpected challenges can become chances to create striking photos.
Mastering natural light in travel photography basics

Light changes fast during the day and can completely change your travel photos. Early in the morning, the soft light gives a calm feel. Around midday, the sun can be very strong and makes hard shadows. Later on, as the light fades, you get unique moods that can turn an ordinary scene into something special.
The best time to shoot is during the golden hours, right after sunrise and just before sunset. The light then has a warm glow and softer contrast, which is perfect for balanced portraits and scenic landscapes. At midday, when the sun is overhead, the harsh light can wash out details. In those moments, try shooting with the sun behind or to the side of your subject to add depth and texture. On cloudy days, the sky acts like a giant diffuser, spreading the light evenly. This is great for capturing soft details and natural expressions.
A little reflector or even a simple white card can help fill in shadows and balance uneven lighting. And always take a quick look at your camera’s histogram to make sure you’re not losing details with blown highlights or deep shadows.
Camera settings breakdown for travel photography basics
Knowing your camera's manual settings gives you full control over your photos. Instead of relying on auto modes, you can adjust exposure, depth-of-field, and motion blur yourself. This makes it easier to handle tricky lighting and fast-changing scenes when you’re on the move.
Aperture Control
Aperture settings usually fall between f/2.8 and f/5.6. A low number like f/2.8 gives you a shallow depth-of-field, so your subject pops against a softly blurred background. If you set it around f/5.6, more of your scene stays in focus. This choice lets you set the mood, whether you want artistic blur or sharp, detailed landscapes.
Shutter Speed Selection
Shutter speed matters when you're capturing movement. Speeds faster than 1/250 s freeze fast action, perfect for bustling street scenes. On the other hand, slower speeds like 1/30 s, used with a tripod to prevent blur, can creatively show motion, for example, the streak of passing cars.
ISO Optimization
ISO affects the amount of grain in your images. In bright conditions, keep ISO between 100 and 400 for cleaner shots. When light is low, raising the ISO to 800-1600 can help you capture the scene, though it might add some grain. This trade-off lets you choose whether to embrace a bit of texture or stick to crystal clear details.
Manual Mode Benefits
Switching to manual mode lets you override the camera’s auto settings. This is especially handy in challenging light where the camera might get confused by bright backgrounds. Quick tweaks mean you can keep both highlights and shadows in check, capturing every detail just right.
Using these settings together lets you create photos that capture the real energy and unique feel of your travel moments.
Composition fundamentals in travel photography basics

Visual balance is essential. It makes your photos pleasing and easy to follow. You arrange details so your eye naturally explores the scene.
Good photography tells a story. It captures real moments so you can experience a small discovery with each picture. How you frame your shot sets the mood and hints at the story behind it.
One simple way to build a strong photo is to use four techniques: Rule of Thirds, leading lines, foreground interest, and natural framing. With the Rule of Thirds, split your frame into a 3×3 grid and place important points along the lines or at their intersections. Leading lines, like roads or fences, guide your eye deeper into the image. Adding interest in the foreground, small details or textures, brings scale and depth, making your photos feel more layered. Natural frames, such as arches, windows, or clusters of plants, help focus on your subject and enrich the story you tell.
Don’t be afraid to change your viewpoint. Moving around can reveal hidden details and offer a fresh look at familiar scenes.
Scenario-based travel photography basics: urban to night
When you head out, your camera needs to keep up with changing scenes. Whether you're in busy streets or quiet corners, each setting deserves its own technique.
Urban Scene Imaging
In the city, tall buildings and open skies create a striking view. Focus on well-known landmarks or lively street scenes and use a wide aperture to keep details sharp. Quick tweaks let you capture the hustle while making your photos dynamic.
Outdoor Portrait Tips
For portraits taken on the move, natural light is gold. If the sun is behind your subject, try using a reflector to soften shadows and even out the light. This works great in urban spots where both people and buildings add interesting backgrounds.
Night & Low-Light Methods
When shooting in the dark, a tripod is your best friend. Set up for longer exposures, about 5-30 seconds, to avoid blur. Aim for an aperture around f/2.8 and an ISO between 800 and 1600 to capture clear, lively night scenes. You can even experiment with light trails and panning blur to show movement.
Adjusting your camera settings for each scene can turn everyday moments into unforgettable visual stories.
Advanced travel photography basics: creative capture techniques
Once you’ve got the basics down, it's time to try advanced techniques that help bring your unique vision to life. These methods go beyond the usual shot, giving your images extra flair.
You can create a wide, sweeping view by stitching 5-10 overlapping photos into one panoramic picture. Give HDR a try by taking photos at slightly different exposures (about ±1-2 EV) and merging them to balance the bright and dark areas. Use burst mode at 5-10 frames per second to catch quick, fleeting moments. You might also experiment with panning: set your shutter speed to 1/30-1/60 seconds, and you'll see a cool blur in the background while your subject stays sharp, adding a sense of movement. Plus, combining multiple exposures with your camera or editing software can boost detail even more.
Practice these techniques often. By experimenting and learning from each shot, you'll soon know when to use each trick, and your creative photography will really shine.
Post-processing workflow for travel photography basics
When you choose between RAW and JPEG, think about how much you want to tweak your photos later. RAW files let you adjust details like exposure and color with ease, perfect for travel when light changes fast. JPEGs, on the other hand, come ready to share with little extra work.
| Software | Platforms | Key Feature | Price |
|---|---|---|---|
| Adobe Lightroom | Mac/PC | Handles RAW import, cropping, exposure, and color grading | Subscription-based |
| Photomator | Mac only | Edits RAW and JPEG files with a streamlined interface | One-time purchase |
| Snapseed | Mobile | Quick on-location tweaks with intuitive controls | Free |
Backing up your photos is a must. Use a local SSD along with cloud storage to keep your work safe from loss. Tag your photos with helpful keywords so you can easily find the perfect shot later. This keeps your digital workflow organized and stress-free.
Mobile apps like Lightroom Mobile and Snapseed let you edit your images right where you are. You can quickly fine-tune color, contrast, and brightness on the go, making your photos ready to share with friends and followers in no time.
Troubleshooting tips in travel photography basics

When you're out capturing travel moments, expect the unexpected. Protect your gear by insuring and labeling your camera and accessories. This simple step helps you replace or recover items faster, saving both time and money. Staying organized means you’re ready for surprises, keeping your shooting day relaxed.
On location, handle your workflow with care. Swap batteries and memory cards quietly so you never miss that perfect shot. Getting your setup done quickly makes for a smoother routine. A small tool kit with a compact reflector or diffuser can really help tame harsh light as scenes shift rapidly.
Take a moment to preview your images in-camera. This way, you can spot focus or exposure issues before moving on. Staying alert means you can catch spontaneous moments and real-life interactions that add extra power to your story. Sometimes, an unexpected scene becomes your best shot. Be flexible and ready to adjust your framing, and act fast when that unique moment appears. Regularly checking your shots helps spot any problems and boosts your creative confidence as you fine-tune your style on the go.
Final Words
In the action, you’ve seen key techniques that refresh your travel photography skills. You explored fundamental frameworks like Rule of Thirds, decisive moments, and shot planning while tackling natural light, camera settings, and even advanced creative methods. Each tip shows how a simple kit and some pre-trip planning can raise your images. This practical guide to travel photography basics gives you clear steps to capture the real story of your trips. Keep experimenting and enjoy turning each snapshot into a vivid memory.
FAQ
Travel photography ideas
Travel photography ideas let you capture moments with different techniques such as using the rule of thirds, golden hours for soft light, and mindful composition to tell a visual story on your travels.
How to take good travel photos with phone
Taking good travel photos with your phone means cleaning the lens, using natural light, and exploring features like HDR mode and editing apps to polish your shots before sharing.
Travel photography jobs
Travel photography jobs involve capturing images for publications, clients, or social media by building a strong portfolio, networking, and exploring freelance opportunities with local and international brands.
Travel photography tips for beginners
Travel photography tips for beginners include using basic techniques like rule of thirds, shooting during golden hours, planning your shots, and keeping your gear minimal to stay agile on the move.
Travel photography PDF
A travel photography PDF is a downloadable guide that outlines essential techniques and practical tips, serving as a quick reference to improve your travel photography skills on the go.
Travel photography instagram
Travel photography Instagram feeds showcase inspiring images and creative ideas, where you can follow professionals for tips, location ideas, and practical advice to build your own visual style.
How to take travel photos of yourself
Taking travel photos of yourself means using a self-timer, remote shutter, or mirror technique to capture natural self-portraits while traveling, ensuring your surroundings are well framed.
Travel photography courses
Travel photography courses offer learning from professionals on techniques and editing skills, helping you improve your composition and storytelling with real-world examples and guided practice.
What is the 20 60 20 rule in photography?
The 20-60-20 rule in photography is a guideline that helps divide the frame for balance, suggesting 20% for key subject elements, 60% for context, and 20% for background details.
What are the 7 C’s of photography?
The 7 C’s of photography refer to a list of elements including clarity, composition, color, contrast, control, creativity, and consistency, which together guide effective image-making.
What is the 400 rule in photography?
The 400 rule in photography is a guideline for setting shutter speed or exposure, suggesting that under certain conditions, a setting around 1/400 sec can minimize blur in fast-moving scenes.
What are the 5 C’s of photography?
The 5 C’s of photography typically include composition, contrast, clarity, color, and creativity, which help in crafting images that are well-balanced and visually engaging.